Skip to content
Mibawood · The Wild Company
EN
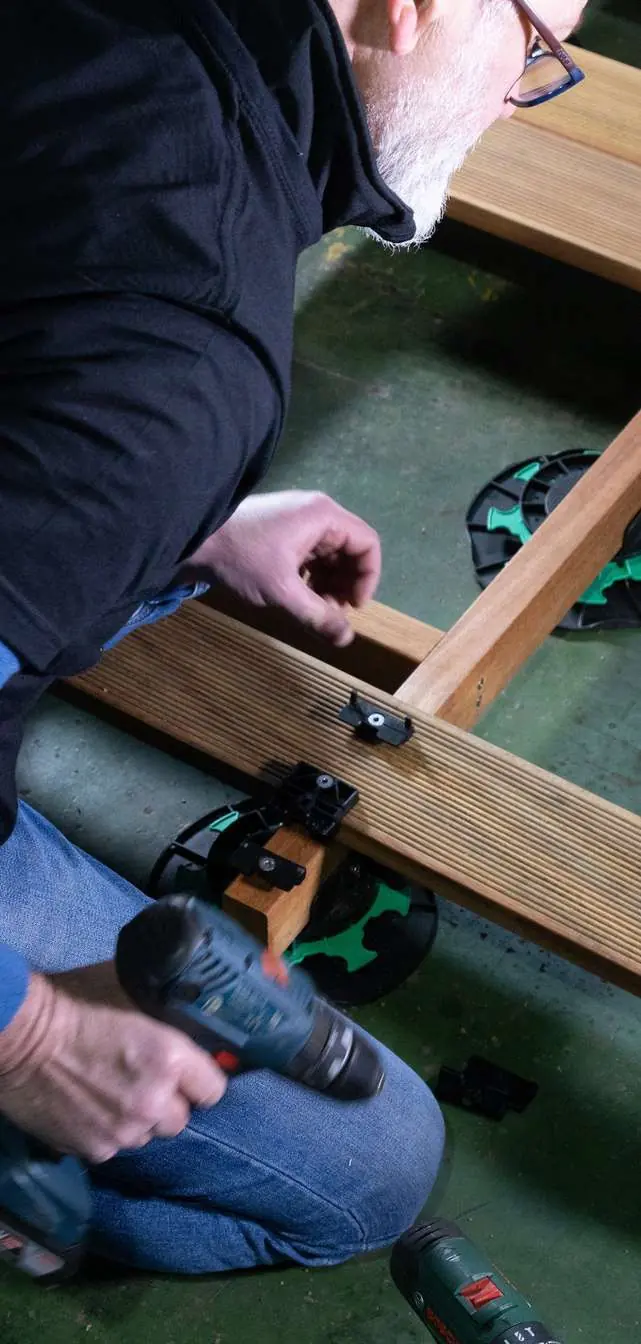
Installer screwing decking boards onto the substructure

Installations

The substructure decides how long the surface lasts.

The air cavity between the base and the boards drains the water, reduces trapped moisture, allows the material to expand and extends the life of the system. It isn't a detail: it is the system.

4

Batten materials: tropical hardwood, bamboo, composite and aluminium

5 mm

The automatic gap MibaFix leaves between tropical hardwood boards

A2 · A4

Stainless steel grades for the clips, suitable for damp or salty environments

0

Foundations needed: the adjustable pedestals level out over the existing surface

Installation · Mibawood

Tropical hardwood

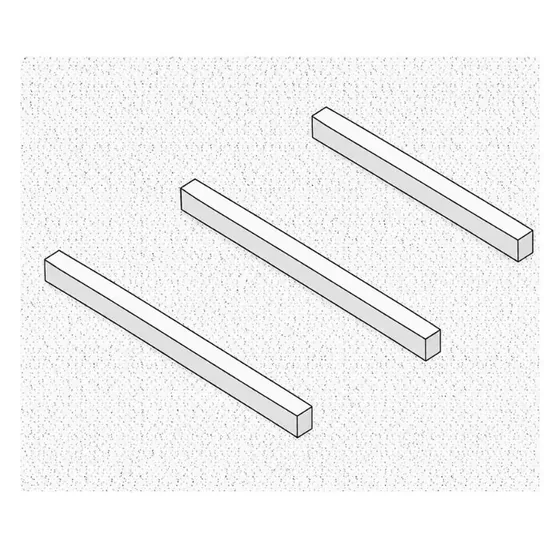
We recommend tropical hardwood battens of the same density or higher: that is what guarantees a solid base and keeps the decking stable over time.

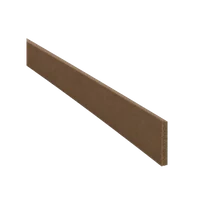
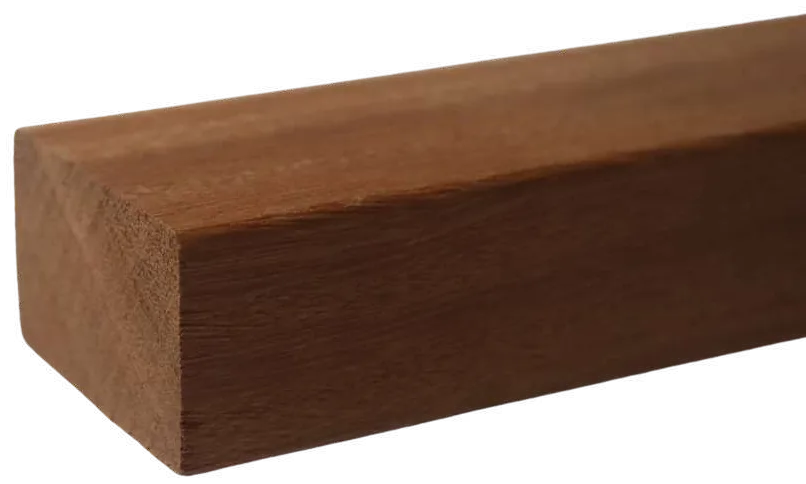
Tropical hardwood batten, 40 by 60 millimetres

Batten 40 × 60

Tropical hardwood

For floors and decking.
Lengths
1500 · 1800 · 2250 mm
Sold as
Packs of 4
Small-section tropical hardwood battens

Batten 21 × 30

Tropical hardwood

For cladding.

Lengths
1500 · 1800 · 2250 mm
Sold as
Packs of 4
Aluminium batten

Batten 15 × 50

Aluminium

For floors or cladding.

Length
2200 mm
Sold as
Packs of 6
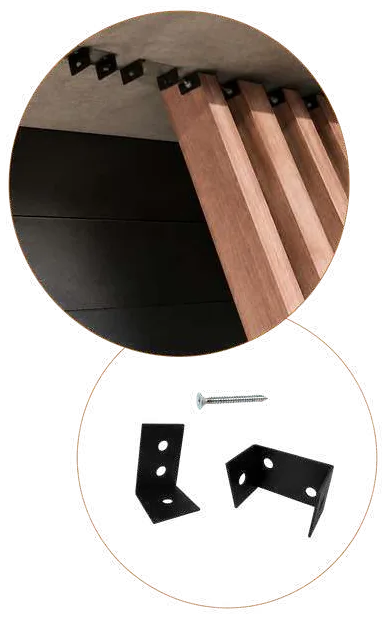
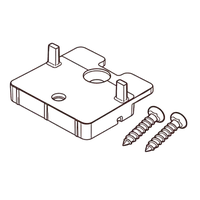
MibaFix invisible fixing system with clips and screws

MibaFix 21 mm

Invisible fixing

For boards from 90 to 145 mm wide and 19 to 25 mm thick. An automatic 5 mm gap and an even spacing between boards.

Kit for 90 mm boards
2.2 m²
Kit for 120 mm boards
3 m²
Kit for 145 mm boards
3.7 m²
Visible fixing
The traditional method: each board is screwed straight onto the substructure.
Invisible fixing
MibaFix, which aids ventilation and lets you replace one board without touching the rest; fitting is slower and more painstaking. Also available with a through-screw gun and a dedicated tool.
Profiles
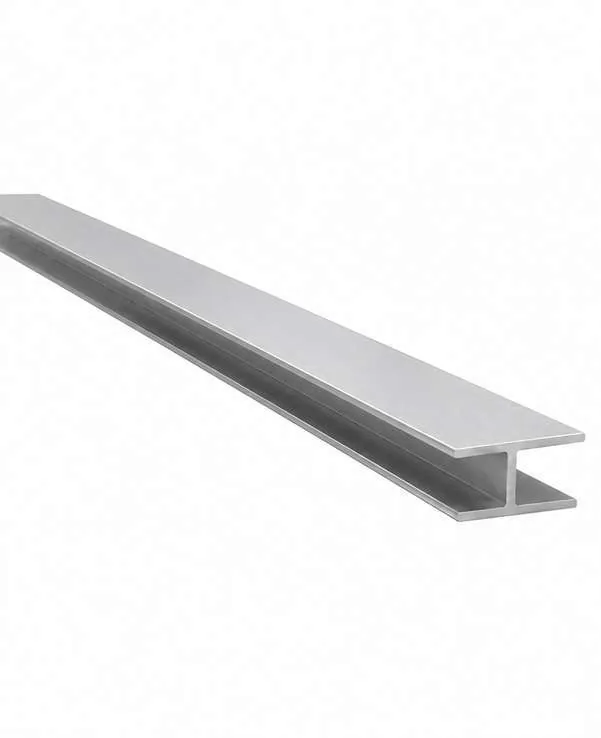
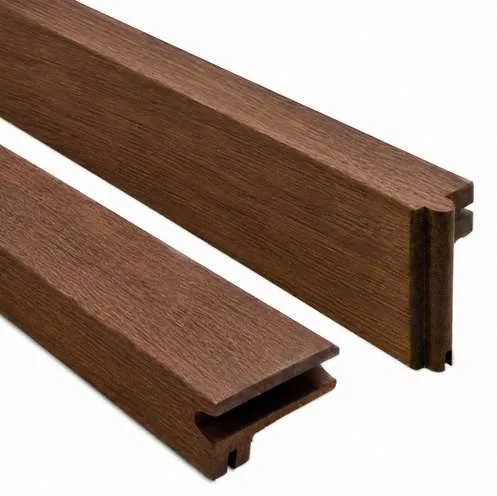
T profile in 50 × 15 mm, L profile in 40 × 40 × 20 mm and double-T profile in 21 × 30 mm, all 1850 mm long.
Changes in level
On terraces, roofs or sloping surfaces, the adjustable pedestals level quickly and precisely, with no foundations.

Tropical hardwood · Fixing system

MibaFix

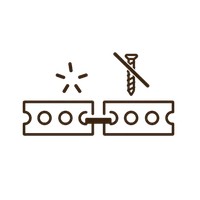
Invisible, modern, clip-in. For anyone after a deck with no visible screws, with a clean look and a secure fixing. A fast, aligned and professional installation, with the timber's natural movement under control.
Before you start

The surface

  • Sub-floor clean, dry, level and with moisture ≤ 12 %.
  • It can be levelled with mortar, wedges or pedestals.
  • Ensure ventilation between the ground and the boards.
  • Minimum fall of 1,5 % towards the outside.
  • Gap between boards of 4-5 mm.

The material

  • Acclimatise the boards for 48 h beforehand, with no direct contact with the ground.
  • Tools made for hardwood.
  • Always pre-drill before screwing.
  • Screws in stainless steel.
  • Grooved boards on steps and wet areas.
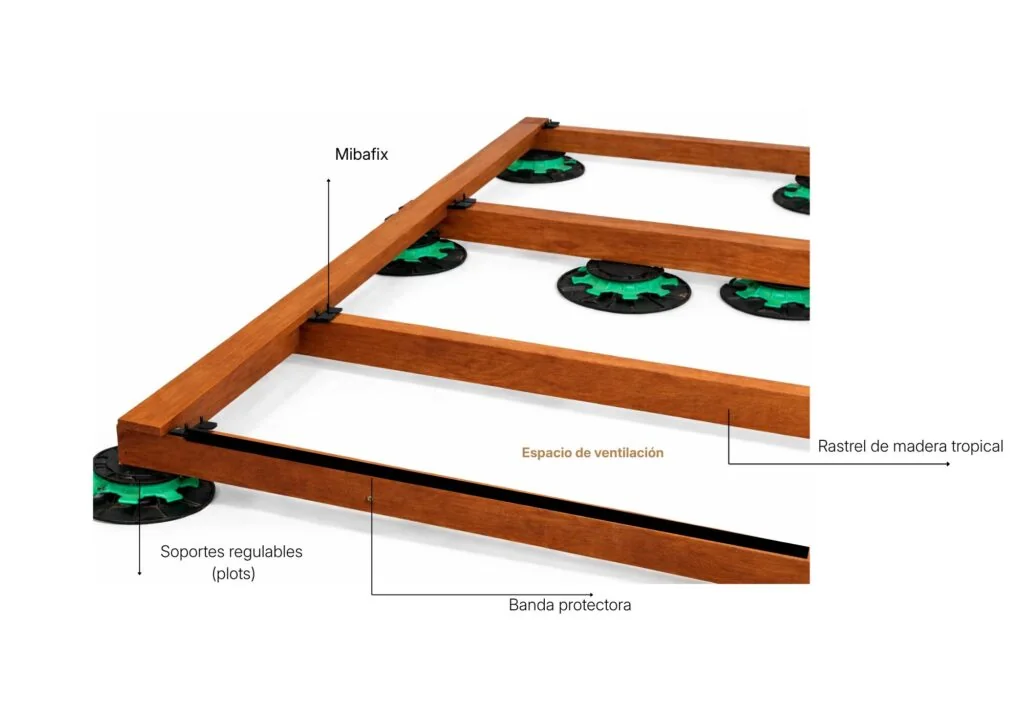
MibaFix system diagram: adjustable pedestals, tropical hardwood joist, protective tape and fixing clip
Map of the surface: adjustable pedestals, joist, protective band and clip.

What the system includes

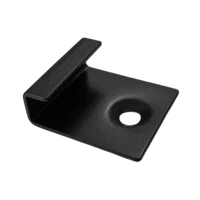
MibaFix clipsInvisible fixing, designed to clip in under the board.
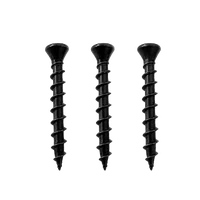
Stainless steel screwsHigh corrosion resistance and long life.
Built-in spacingGuarantees an even gap between boards.

What it gives you

  • Completely invisible fixing
  • Faster, more precise installation
  • Even gap between boards
  • Natural movement under control
  • Professional, long-lasting finish

The ten steps

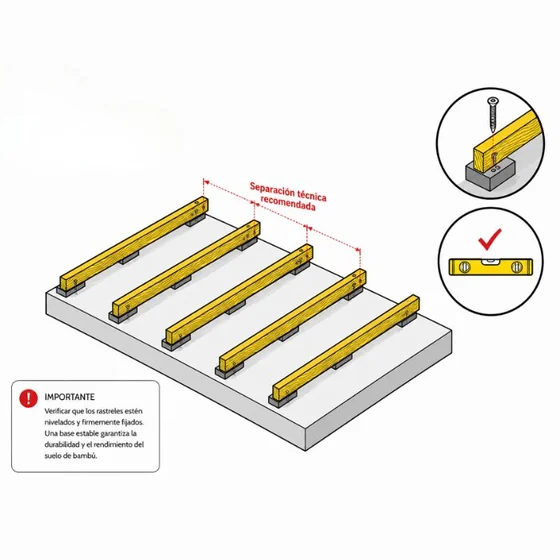
  1. MibaFix installation, step 1: base structure

    Step 1

    Base structure

    Building the substructure with the right joists and the correct spacing for the board thickness.
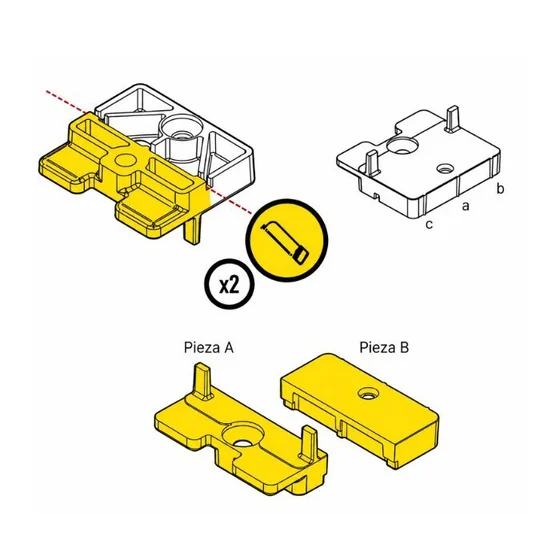
  2. MibaFix installation, step 2: preparing the fixings

    Step 2

    Preparing the fixings

    Identifying, cutting and preparing the fixing pieces ready for the installation.
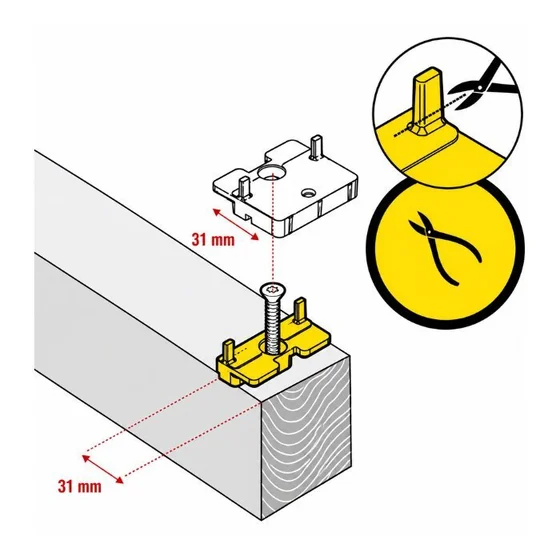
  3. MibaFix installation, step 3: preparing the joists

    Step 3

    Preparing the joists

    Pre-drilling and the first placing of the fixings onto the joists, precisely.
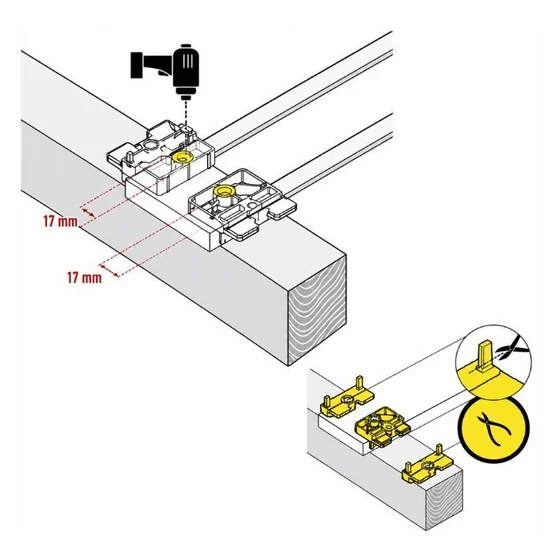
  4. MibaFix installation, step 4: fitting the first board

    Step 4

    Fitting the first board

    Marking and pre-drilling the first board to get the alignment right.
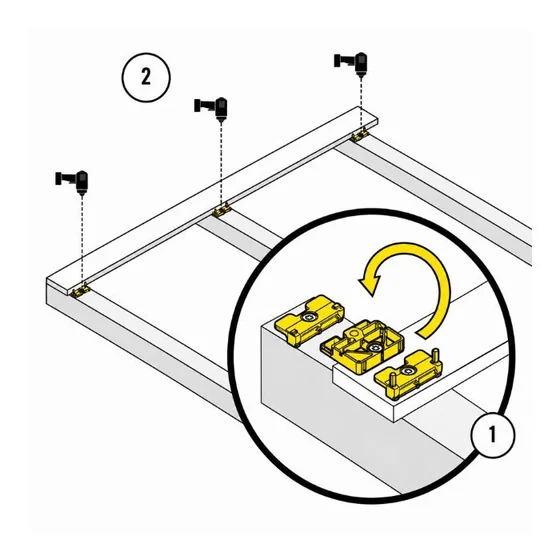
  5. MibaFix installation, step 5: fixing the first board

    Step 5

    Fixing the first board

    Placing and screwing the first board onto the base structure.
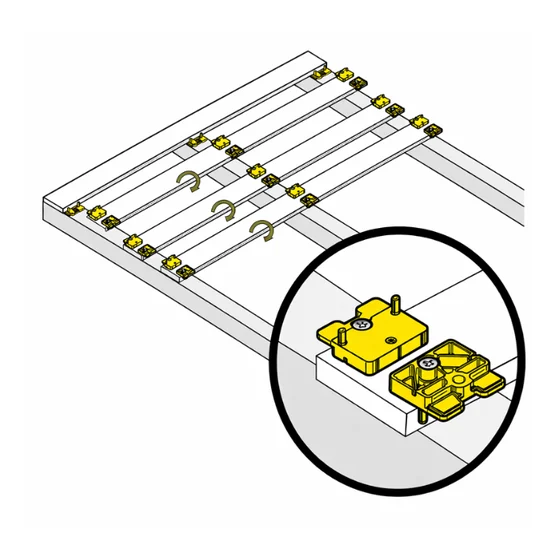
  6. MibaFix installation, step 6: preparing the rest of the boards

    Step 6

    Preparing the rest of the boards

    Pre-fitting the clips on every board to speed the installation up.
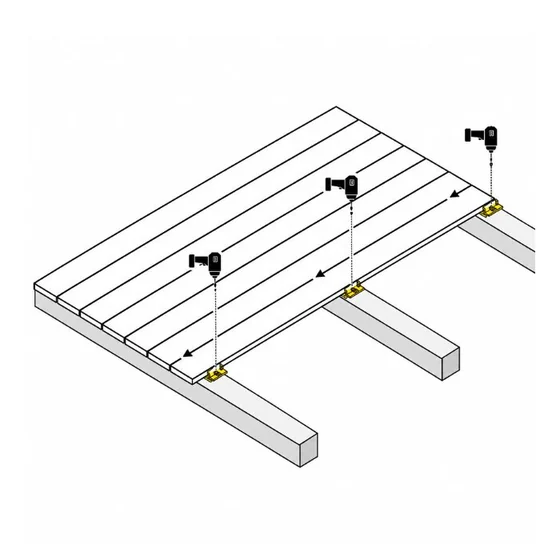
  7. MibaFix installation, step 7: fixing the boards

    Step 7

    Fixing the boards

    Fitting the boards one after another, keeping the gap between them even.
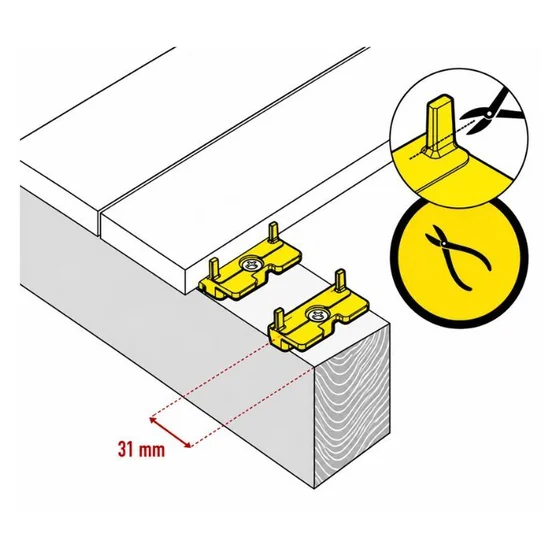
  8. MibaFix installation, step 8: final preparation

    Step 8

    Final preparation

    Adjusting the fixings at the far end before placing the last board.
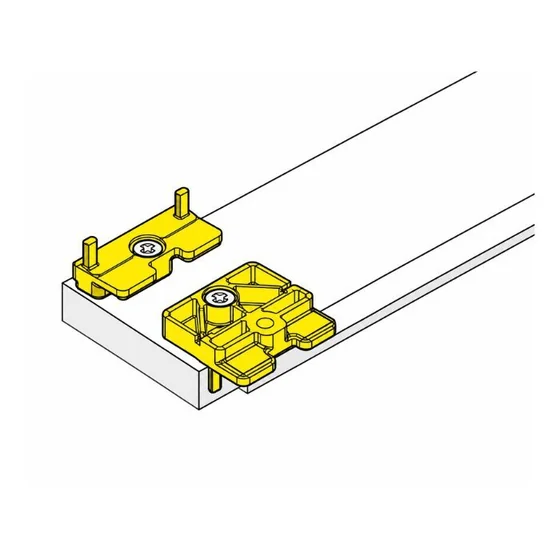
  9. MibaFix installation, step 9: fixing the last board

    Step 9

    Fixing the last board

    Placing and securing the last board with its fixings.
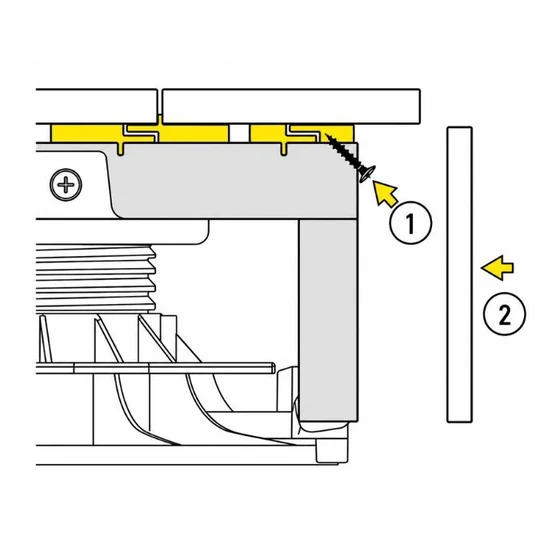
  10. MibaFix installation, step 10: finishing the perimeter

    Step 10

    Finishing the perimeter

    Finishing the perimeter and the final fixing, for the stability and the look of the whole.

Tropical hardwood · Fixing system

CAMO®

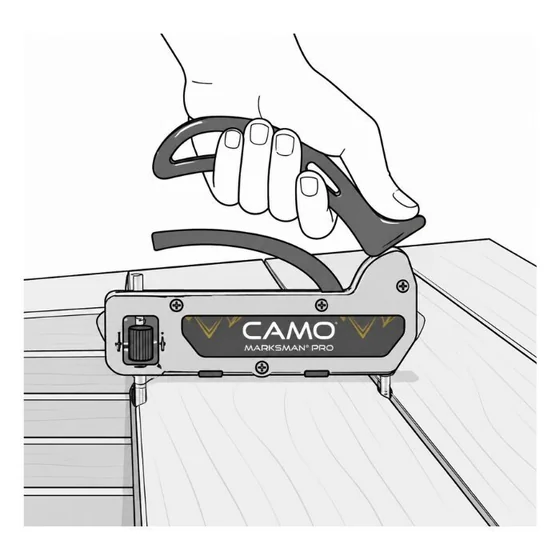
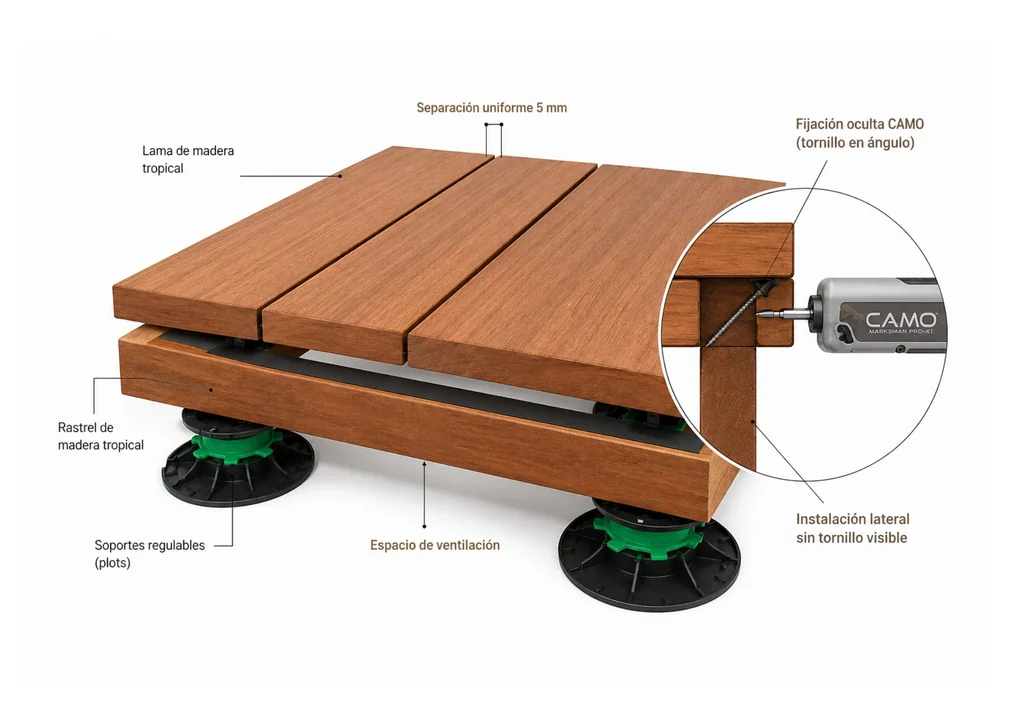
Invisible, precise, durable. The CAMO Marksman® system fastens with screws driven at an angle through the edges of the board, with no visible holes on the surface. Suitable for tropical hardwood, composite and PVC.
Before you start

The surface

  • Sub-floor clean, dry, level and with moisture ≤ 12 %.
  • It can be levelled with mortar, wedges or pedestals.
  • Ensure ventilation between the ground and the boards.
  • Minimum fall of 1,5 % towards the outside.
  • Gap between boards of 4-5 mm.

The material

  • Acclimatise the boards for 48 h beforehand, with no direct contact with the ground.
  • Tools made for hardwood.
  • Always pre-drill before screwing.
  • Screws in stainless steel.
  • Grooved boards on steps and wet areas.
Diagram of the CAMO system: tropical hardwood board, joist, adjustable pedestals and angled side screw
Map of the surface: the screw enters through the edge, at an angle and hidden.

What the system includes

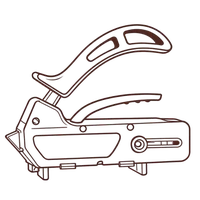
CAMO Marksman toolGuides the screws at an angle and keeps the gap uniform.
CAMO® screwsDesigned specifically for invisible side fastening.
Built-in spacingAutomatic spacing between boards.

What it gives you

  • Invisible fastening from the edges
  • Precise automatic spacing
  • Works with tropical hardwood and composite

  • Lifetime warranty against corrosion

The steps

  1. Step 1: setting the tool

    Step 1

    Setting the tool

    Set the CAMO to the width of the board to ensure precise fastening.
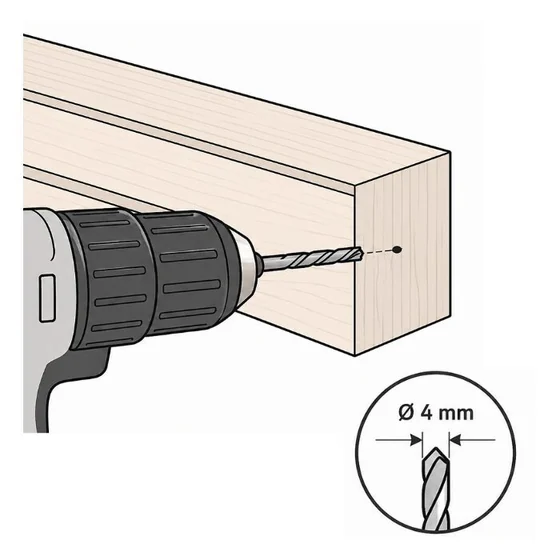
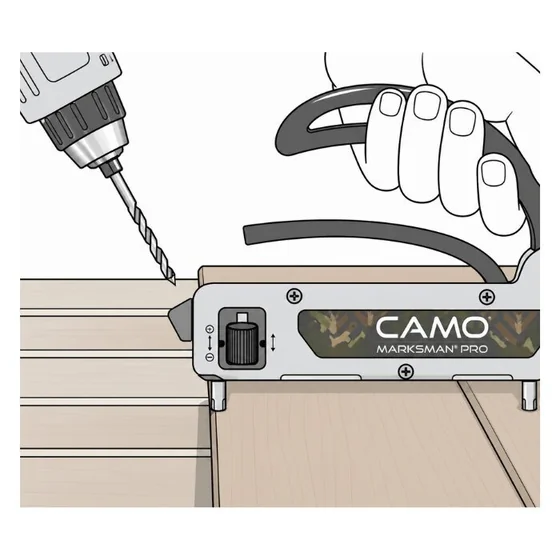
  2. Step 2: pre-drilling

    Step 2

    Pre-drilling

    Pre-drill with a Ø 4 mm bit on the sides to avoid splitting.
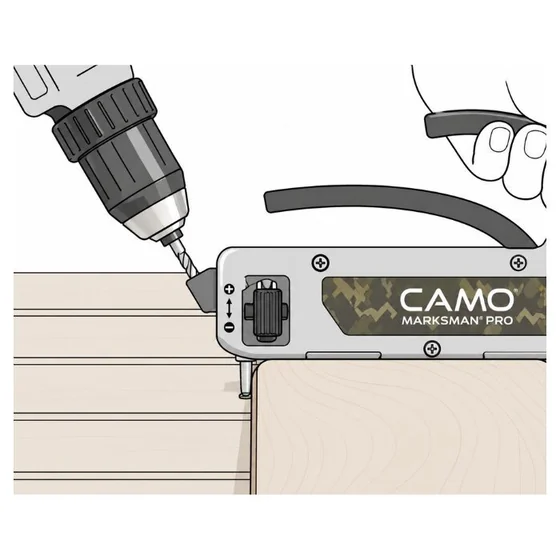
  3. Step 3: angled fastening

    Step 3

    Angled fastening

    Drive the screw at an angle, guided by the tool, for a hidden hold.
  4. Step 4: final screwing

    Step 4

    Final screwing

    Drive the CAMO screw all the way home for a firm, stable joint.

Tropical hardwood · Fixing system

Visible screw

Precision, strength, confidence. The most direct and structural solution for tropical hardwood decking: a firm fixing, full control during assembly and optimal strength in both residential and professional projects.

Before you start

The surface

  • Sub-floor clean, dry, level and with moisture ≤ 12 %.
  • It can be levelled with mortar, wedges or pedestals.
  • Ensure ventilation between the ground and the boards.
  • Minimum fall of 1,5 % towards the outside.
  • Gap between boards of 4-5 mm.

The material

  • Acclimatise the boards for 48 h beforehand, with no direct contact with the ground.
  • Tools made for hardwood.
  • Always pre-drill before screwing.
  • Screws in stainless steel.
  • Grooved boards on steps and wet areas.
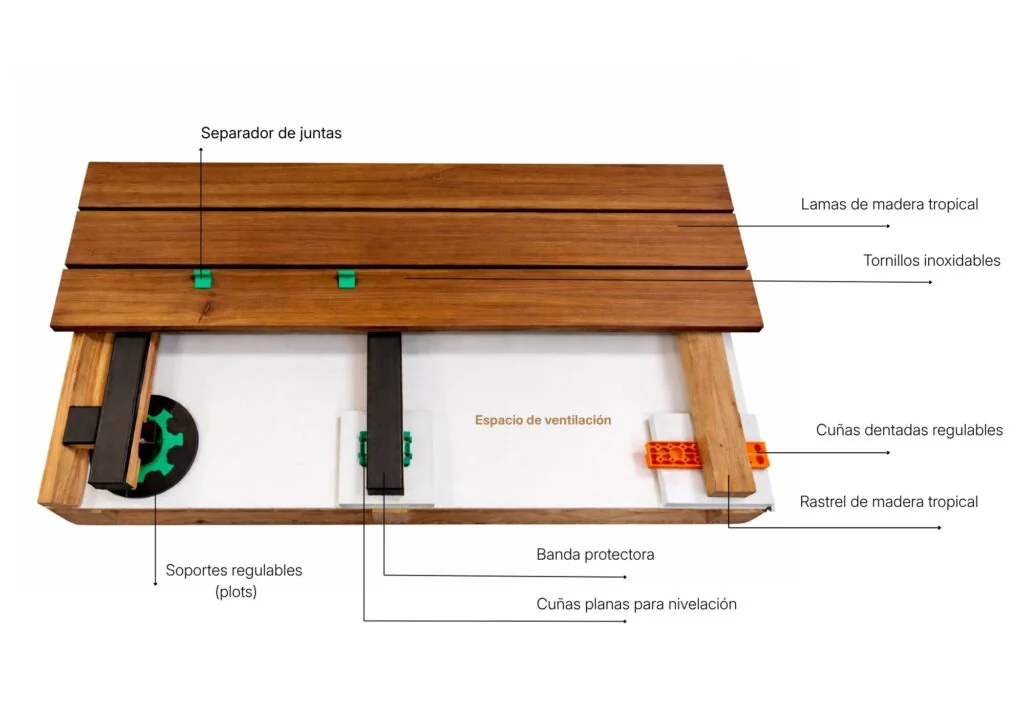
Diagram of the visible-screw system: boards, joint spacer, joist, protective band and adjustable pedestals
Map of the surface: joint spacer, protective band and adjustable pedestals.

What it gives you

  • Direct structural fastening
  • Maximum mechanical strength
  • Full control during installation
  • Ideal for high-traffic projects

The boards

  1. Step 1: first board

    Step 1

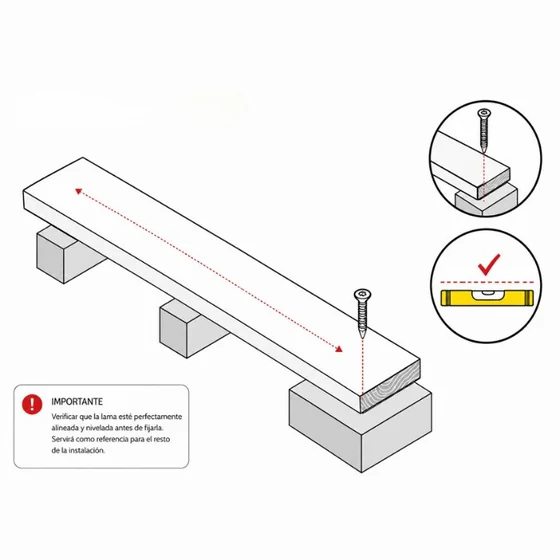
    First board

    Lay the first board on the substructure, aligned and level: it is the reference for the whole installation.
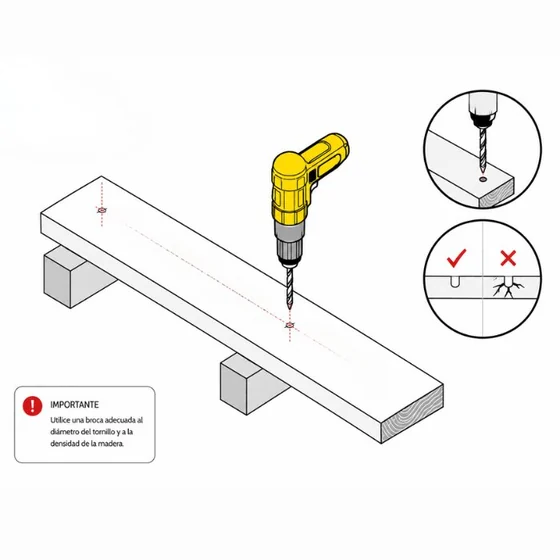
  2. Step 2: pre-drilling

    Step 2

    Pre-drilling

    Drill every fastening point before screwing to avoid splitting the wood.
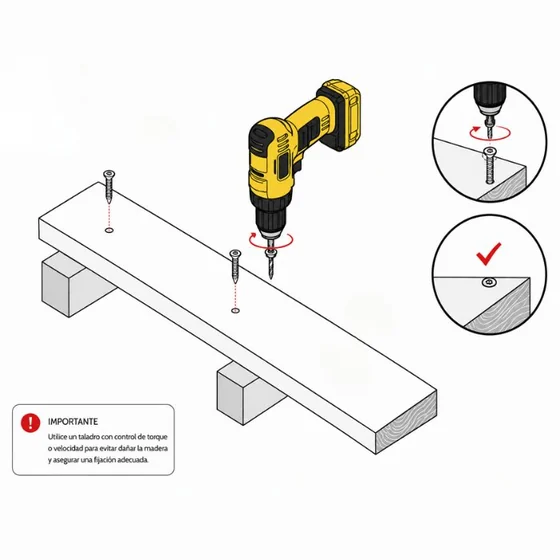
  3. Step 3: fastening

    Step 3

    Fixing

    Screw in with a stainless steel screw at each drilled point, for a firm and lasting hold.
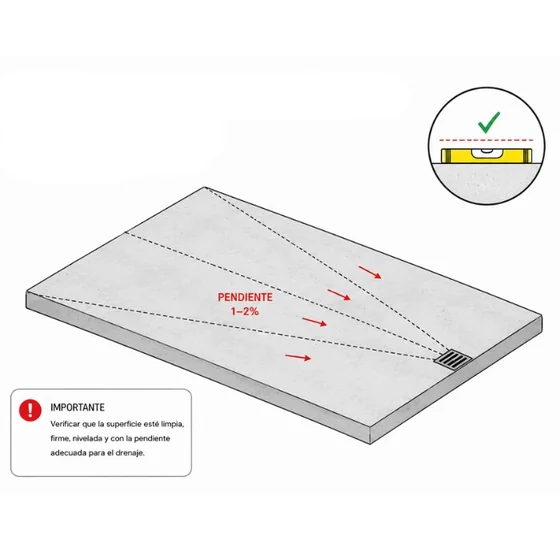
On a concrete slab

  1. Step 1: preparing the base

    Step 1

    Preparing the base

    A properly levelled slab is required, sloped for water run-off.
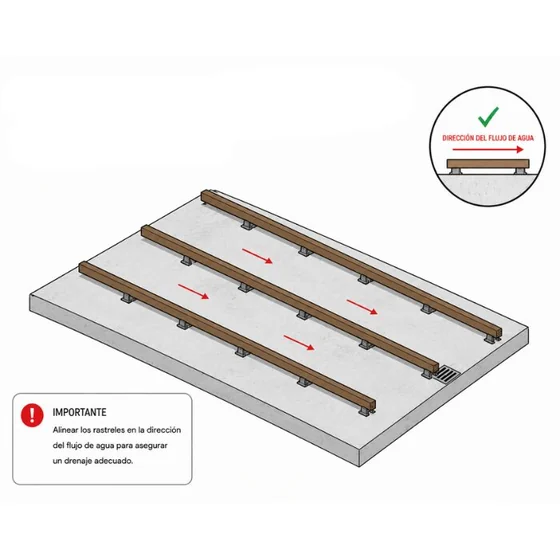
  2. Step 2: laying the joists

    Step 2

    Laying the joists

    The joists are laid in the direction of the water run-off.
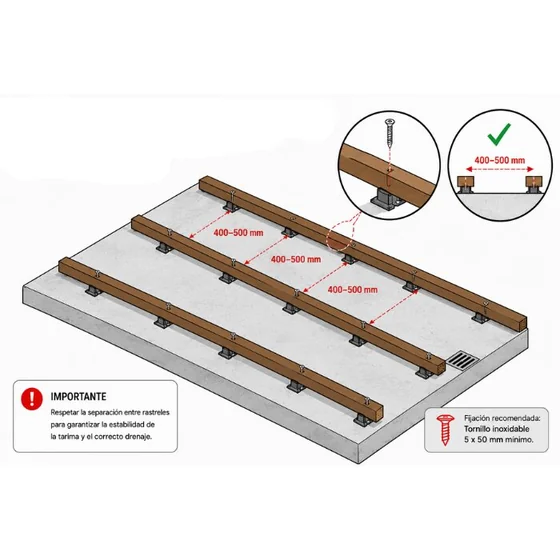
  3. Step 3: fastening and spacing

    Step 3

    Fastening and spacing

    The joists are fixed keeping to the stated spacing.
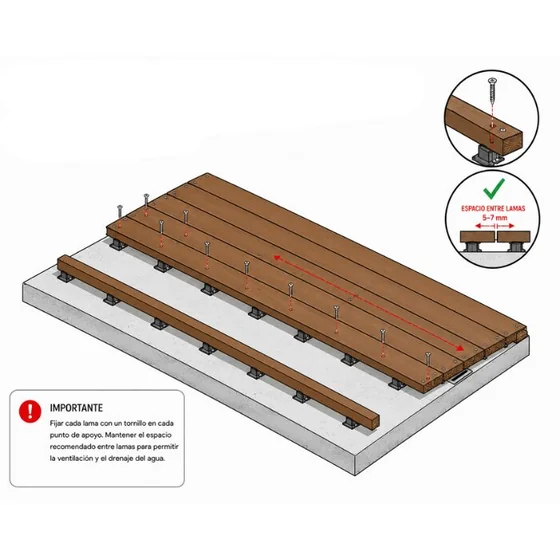
  4. Step 4: installing the boards

    Step 4

    Installing the boards

    Fasten the decking boards correctly.

On permeable ground

  1. Step 1

    Preparation and clearing

    Prepare the ground properly levelled and remove 15 to 20 cm of soil.

  2. Step 2

    Geotextile barrier

    Lay a geotextile fabric at the bottom of the slope to stop weeds growing through.

  3. Step 3

    Structural base and levelling

    Fill with stabilised material of different grain sizes and set concrete blocks to fix the joists on top, all level.

  4. Step 4

    Slope and drainage

    Plan a slope so that water does not pool.

Installation · Mibacomp

WPC composite

The clips are high-strength stainless steel: they don't deform or rust, and they hold a constant gap between boards so the deck ventilates and drains.
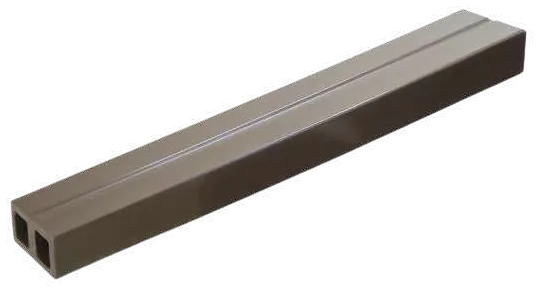
Composite batten, 30 by 50 millimetres

Batten 30 × 50

Composite

A match for the decking itself.

Length
2200 mm
Sold as
Packs of 4
Aluminium batten

Batten 15 × 50

Aluminium

Dimensional stability and corrosion resistance.
Length
2200 mm
Sold as
Packs of 6
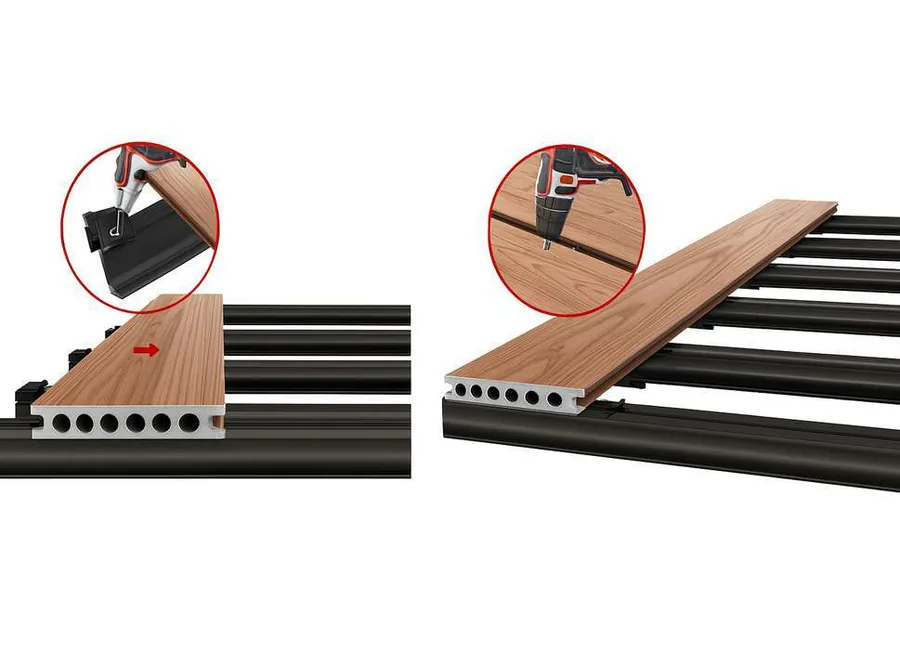
Diagram of the fixing clip for composite boards

Decking kit · 2.5 m²

Invisible system

Everything you need, per square metre.
Includes
70 screws
10 starter clips
60 plastic clips
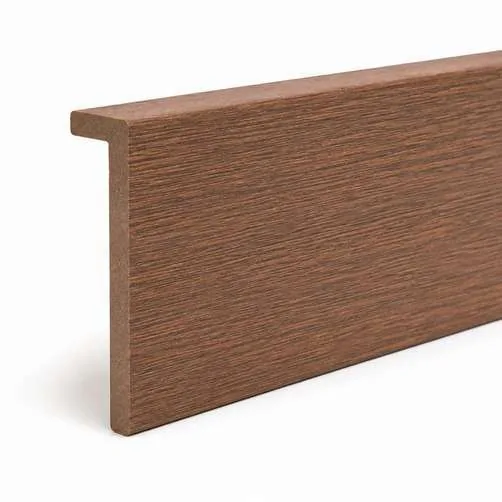
Composite finishing trim

Trim 11 × 71

Finish

Hides holes and side grooves.

Length
2200 mm
Colours
Brown, oak, grey and black

Edge profiles

Edge profiles for composite
ProfileSection LengthColours
Straight profile49 × 49 mm2200 mm Brown, oak, grey and black
Angle profile49 × 49 mm2200 mm Brown, oak, grey and black
Angle profile · Clásico and Rounding49.5 × 49.5 mm2200 mm Brown, oak, grey and black
Trim11 × 71 mm2200 mm Brown, oak, grey and black
Compatibility
Substructures in composite, aluminium or class 4 tropical hardwood.
Changes in level
Adjustable pedestals to level quickly and secure the drainage, even over uneven surfaces.

Composite WPC · Decking

Hidden clips

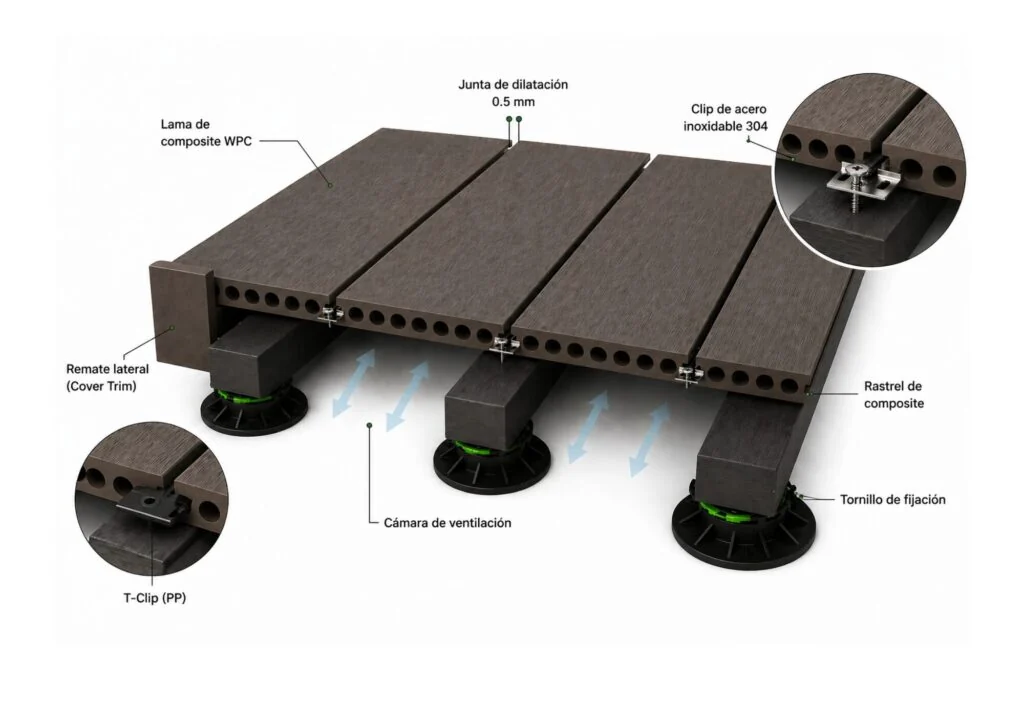
The clips slot into the side groove of the board and screw to the joist: a firm, even hold with not one screw showing on the surface.
Before you start

The surface

  • The base must be firm, stable and perfectly level.
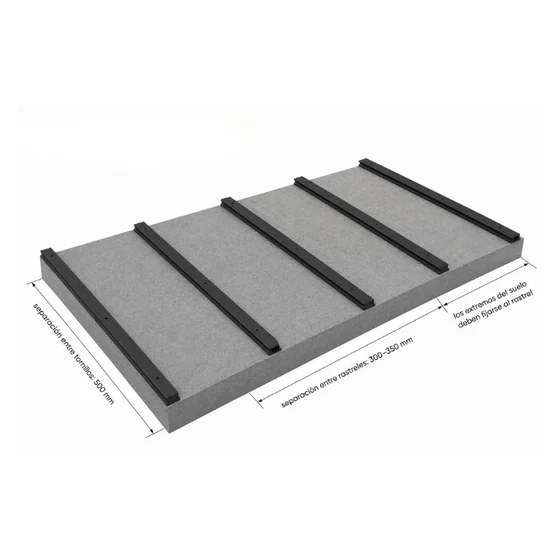
  • Joists every 300-350 mm, fixed with screws every 500 mm.
  • 15 mm minimum between the structure and any wall or fixed obstacle, for expansion.
  • Ventilation under the decking to avoid moisture building up.
  • A slight slope towards the outside to drain the water.

The material

  • Only with the recommended clips and screws, with no visible fasteners.
  • Pre-drill before screwing so as not to damage the material.
  • The clip keeps the gap between boards automatically even.
  • The ends of every board always rest on a joist.
Diagram of the clip system for composite decking: joist, T-Clip and board
Map of the surface: joist, T-Clip and board clipped in.

What the system includes

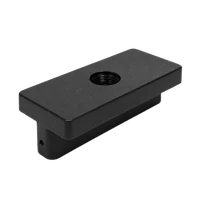
T-Clip (PP)Intermediate fastener that joins board and joist invisibly.
Start and end clipsTo fix the first and the last board.
Specific screwsEnsures a firm and lasting hold.
Side trimFinishing profile, optional, for a professional edge.

What it gives you

  • No screws on the surface
  • Allows lengthwise expansion
  • High outdoor resistance
  • A clean, professional finish

The steps

  1. Step 1: installing the joist

    Step 1

    Installing the joist

    Fixing the base structure, making sure it is level and correctly spaced.
  2. Step 2: starter clip

    Step 2

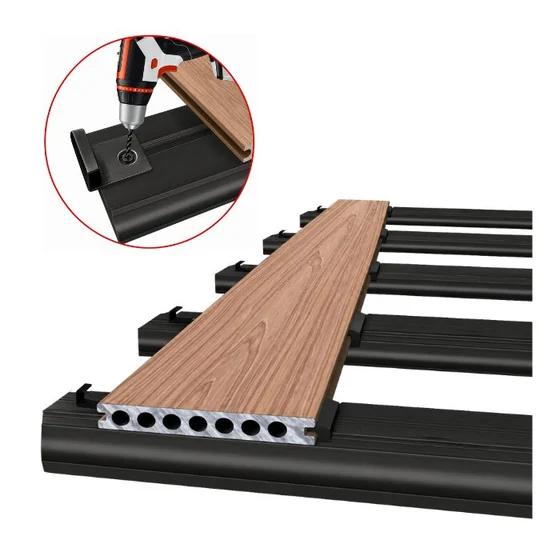
    Starter clip

    Fitting the starter clip at the end, to position the first board.
  3. Step 3: fitting the t-clip

    Step 3

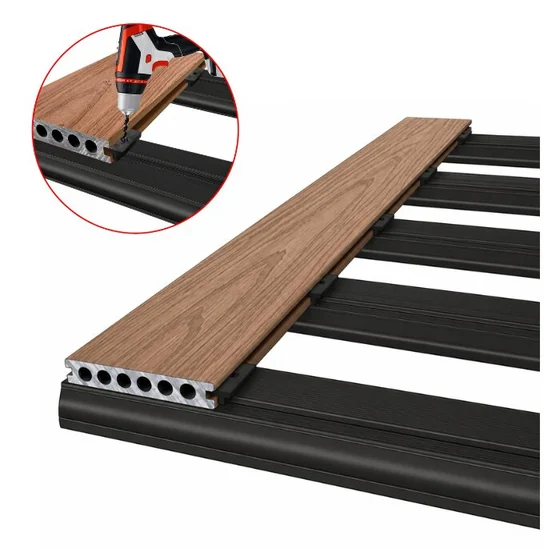
    Fitting the T-Clip

    Inserting the T-Clip into the side groove and screwing it to the joist.
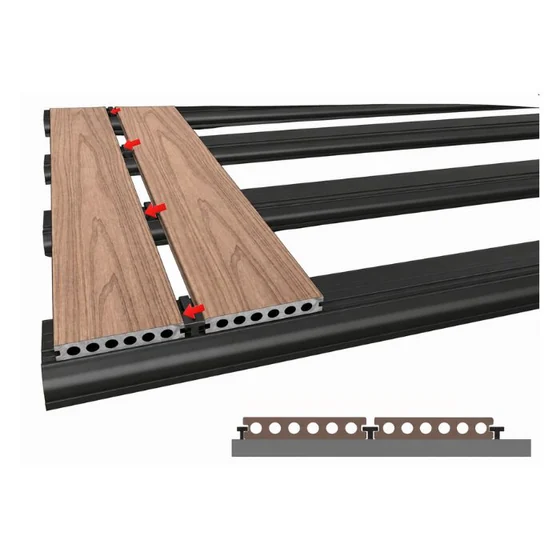
  4. Step 4: installing the board

    Step 4

    Installing the board

    Clipping the board onto the T-Clips, keeping it aligned and evenly spaced.
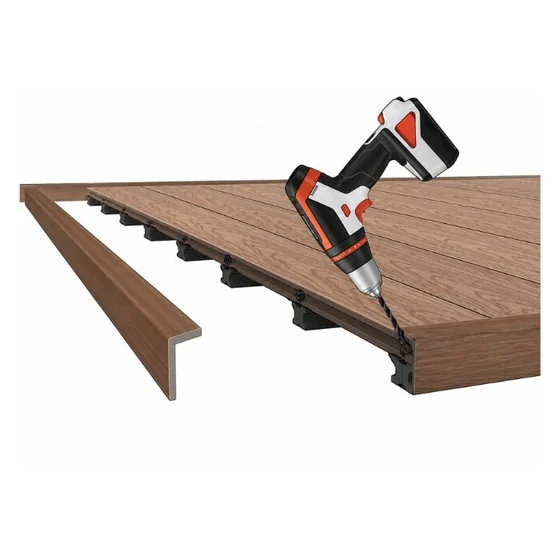
  5. Step 5: carry on installing

    Step 5

    Carry on installing

    Repeating the process to keep the installation even.
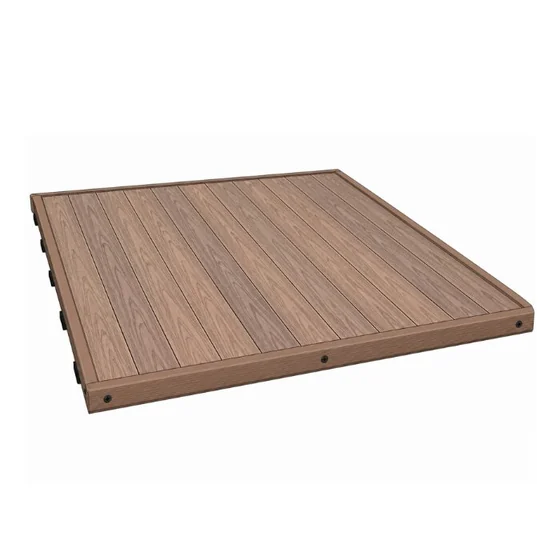
  6. Step 6: side trim

    Step 6

    Side trim

    Fitting the side profile for a clean finish.

Composite WPC · Cladding

Invisible screw

For outdoors and indoors. The screw stays hidden by the overlap between panels or behind the finishing profiles, so the result is a continuous, clean wall, hard-wearing and low-maintenance.
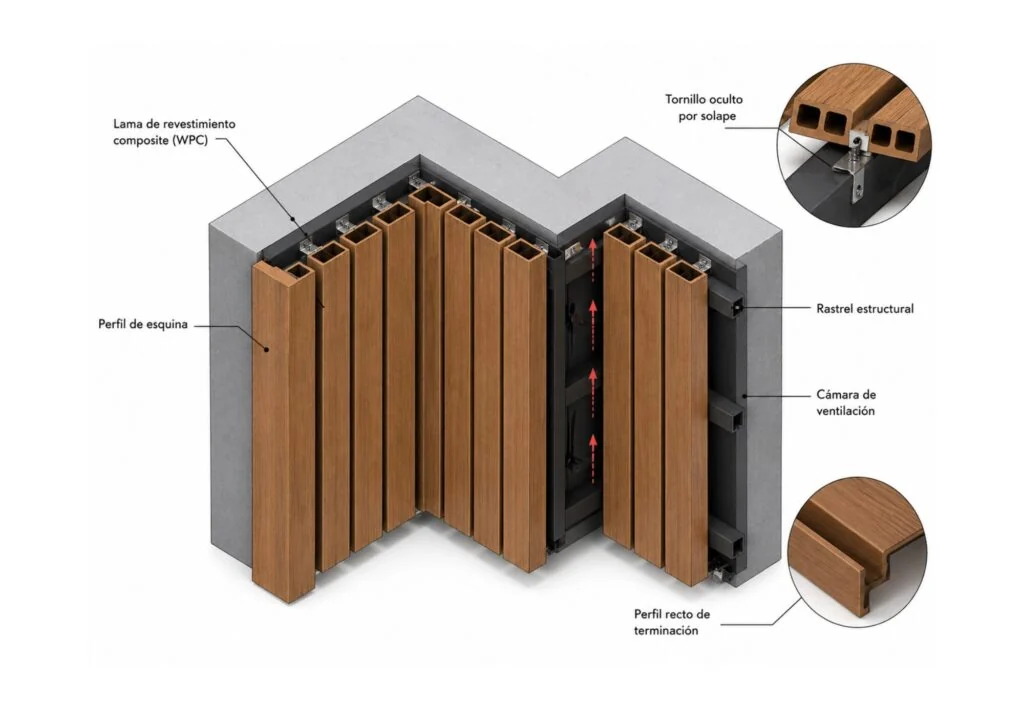

Before you start

The surface

  • The wall must be firm, flat and level before the substructure goes up.
  • A joist substructure is compulsory : never the panel straight onto the wall.
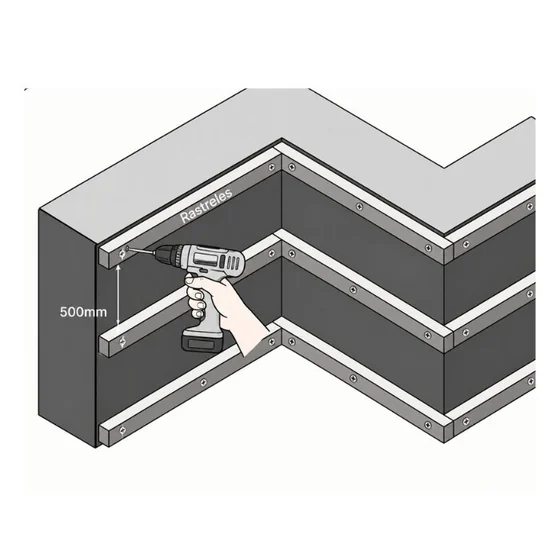
  • Joists with a spacing of 500 mm maximum.
  • In a horizontal installation, screws roughly every 400 mm.
  • Ventilation between the wall and the cladding, to avoid damp.

The material

  • Screws hidden through the overlap between panels or behind a finishing profile.
  • Pre-drill before screwing so as not to damage the composite.
  • The corner and finishing profiles are compulsory: they protect the edges.
  • Cut and fit the panels to the real measurements before assembly.
Diagram of the composite cladding: wall, joist, panel and finishing profile
Map of the surface: joist on the wall, overlapped panel and trim profile.

What it gives you

  • Safe structural fastening
  • Invisible screws
  • Low maintenance
  • High dimensional stability
  • A clean, professional finish

Vertical installation

  1. Step 1: installing the joist

    Step 1

    Install the joist

    A solid base on a level surface, with 500 mm spacing.
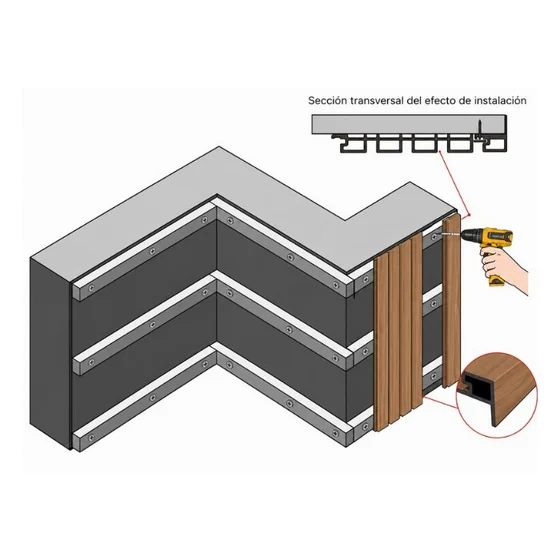
  2. Step 2: starter profile

    Step 2

    Starter profile

    Starter profile at the foot of the cladding, to align it and hide the fasteners.
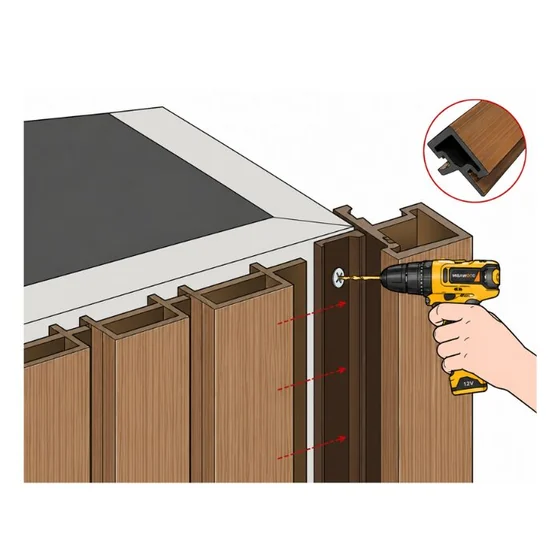
  3. Step 3: corner profile

    Step 3

    Corner profile

    A profile at the corners for a clean meeting between panels, with the screw hidden.
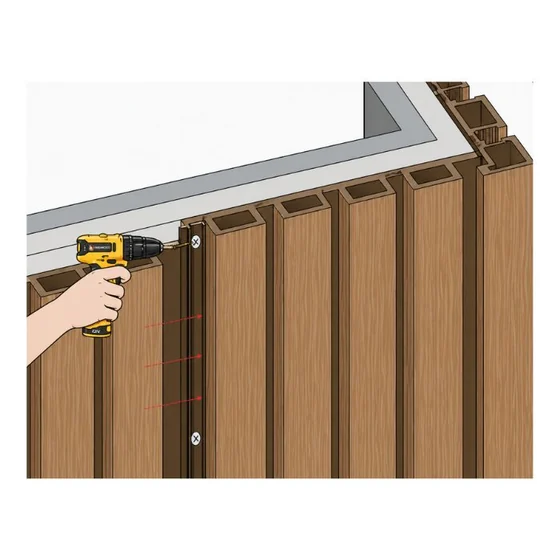
  4. Step 4: fitting the panels

    Step 4

    Fitting the panels

    Continuous panels, screwed and overlapped, for an invisible and even installation.
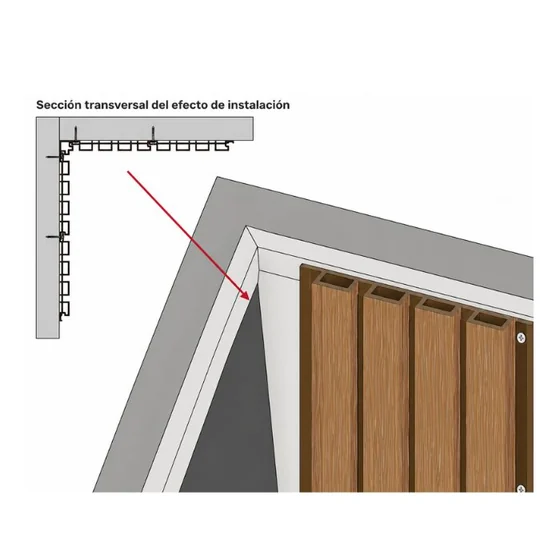
  5. Step 5: carrying the system through

    Step 5

    Carrying the system through

    Keep the overlap between panels: stability and the screws completely out of sight.
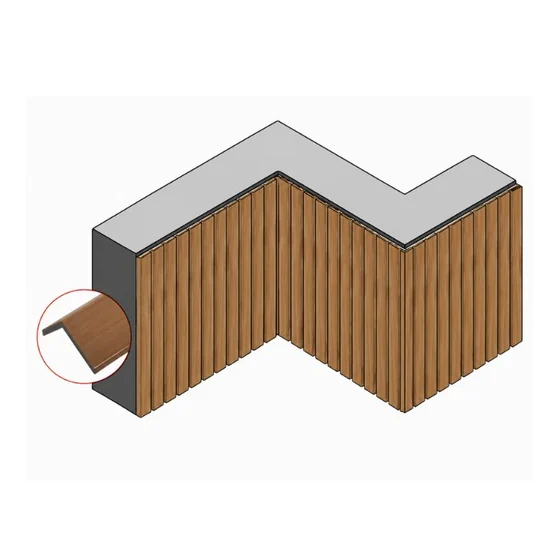
  6. Step 6: final trim

    Step 6

    Final trim

    Finishing profiles for a neat, protected and lasting edge.

Installation · Mibambú

Bamboo

The boards sit raised on aluminium or bamboo battens, to help the water drain and the air circulate. That reduces trapped moisture and keeps the boards dimensionally stable.
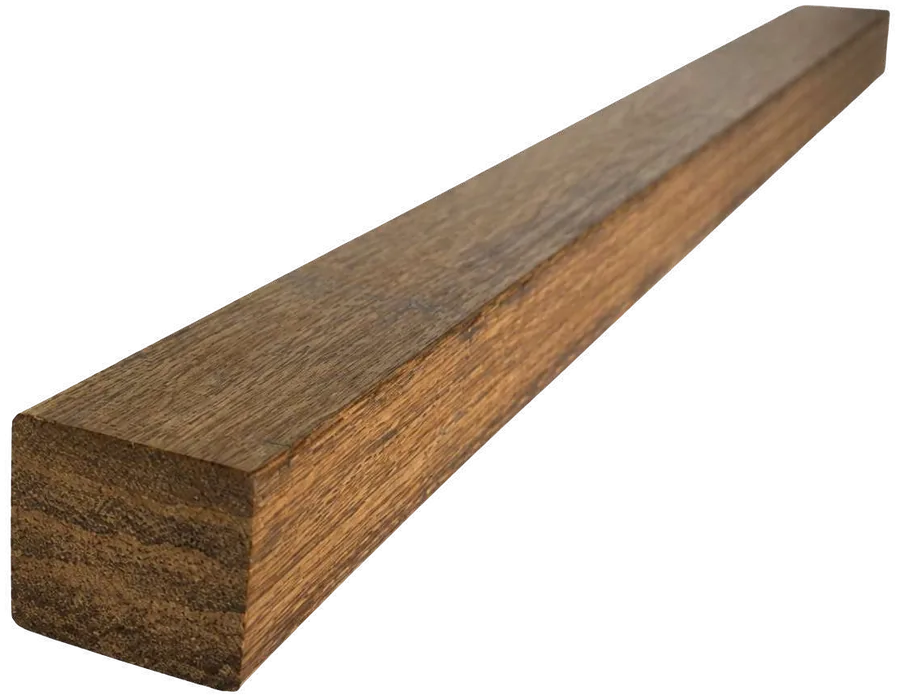
Bamboo batten, 40 by 60 millimetres

Batten 40 × 60

Bamboo

Structural base for bamboo decking.

Length
1860 mm
Sold as
Packs of 4
Aluminium batten

Batten 15 × 50

Aluminium

For floors or cladding.

Length
2200 mm
Sold as
Packs of 6
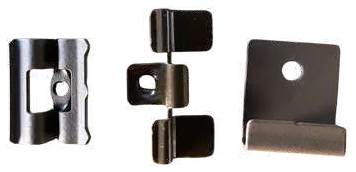
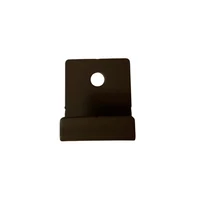
Stainless steel technical clips for bamboo

Technical clip

A2 / A4 stainless steel

An even gap between boards, with mechanical and thermal resistance. Suitable for damp or salty environments.
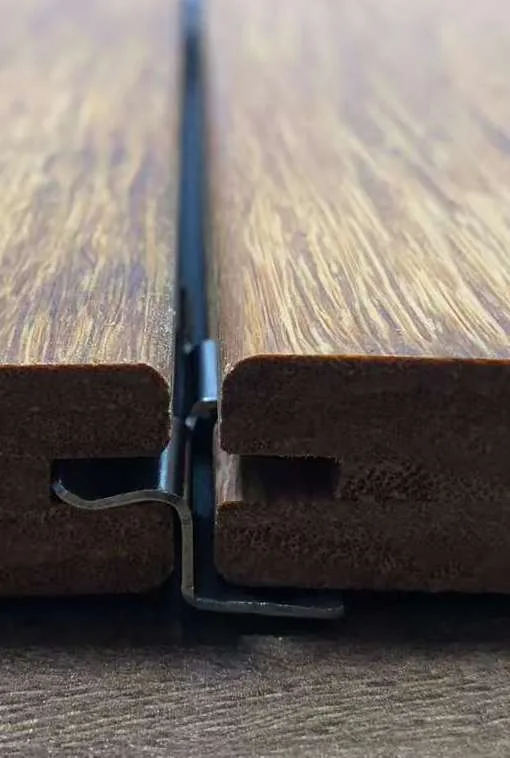
Fixing clip in place between two bamboo boards

Installation kits

Invisible system

Counted by the square metre.

Decking · 5 m²
90 clips, 1 drill bit, 5 finishing clips
Cladding · 3 m²
90 clip sets, 1 drill bit

Edge profiles

Edge profiles for bamboo
ProfileSection Length
T profile50 × 15 mm1850 mm
L profile40 × 40 × 20 mm1850 mm
Double-T profile20 × 21 mm1850 mm
Compatibility
Battens in bamboo, aluminium or tropical hardwood.
Changes in level
Adjustable pedestals, which secure the ventilation underneath even on uneven ground.
Fixings
The decking kit includes screws made specifically for bamboo.

Bamboo · Decking

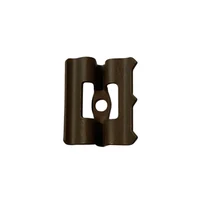
Hidden fastening clips

The clip goes into the side groove of each board and screws to the joist, with not a single hole in sight. An even gap, ventilation between pieces and protection against damp and splitting.
Before you start

The surface

  • A firm, level base and a slope for drainage.
  • Joists with a maximum spacing of 500 mm — 465 mm recommended for 1860 mm boards.
  • Substructure at 80 mm minimum off the ground, never in contact with damp surfaces.
  • Perimeter expansion joints against any wall or fixed obstacle.
  • Continuous ventilation under the floor.
  • Minimum slope of 6 mm per metre to drain the water.

The material

  • Only with hidden fastening clips and stainless steel screws A2 or A4.
  • Pre-drill at the end fastenings to avoid splitting or internal stresses.
  • The clip guarantees the even gap and the natural movement of the bamboo.
  • The ends of every board always rest always on a joist.

What the system includes

Hidden fastening clipsThey join board and joist without touching the face.
Start and end clipsTo fix the first and the last board.
Specific screwsA firm, lasting hold outdoors.

What it gives you

  • Invisible fixing
  • An even gap
  • Better ventilation
  • Longer life outdoors

The steps

  1. Step 1: joist

    Step 1

    Batten

    A solid, level base. Fix the joists at the recommended spacing so they carry the loads in use.
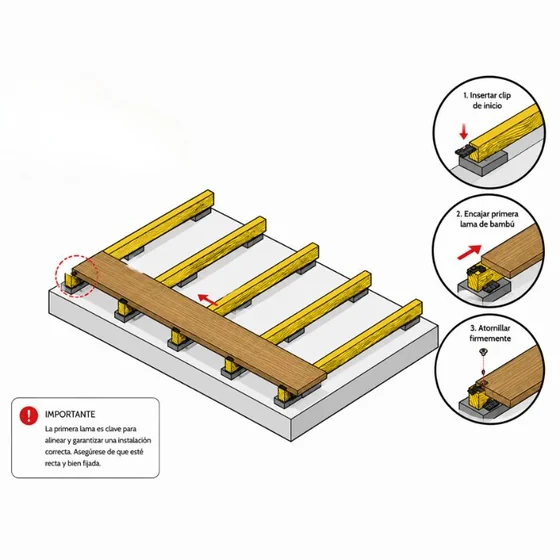
  2. Step 2: first board

    Step 2

    First board

    Fit the starter clip at the edge of the joist, clip in the first board and screw it down firmly.
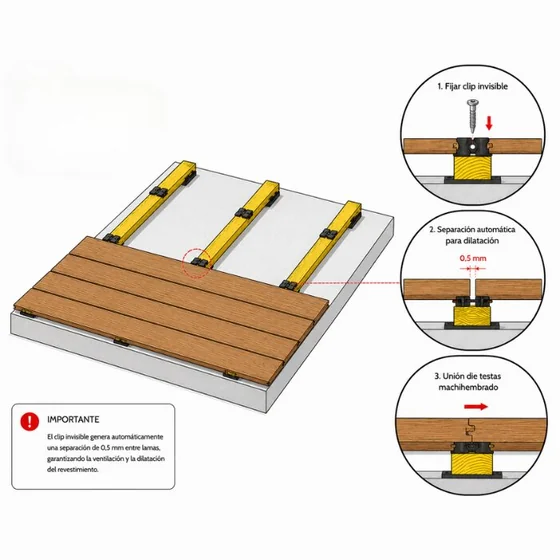
  3. Step 3: middle boards

    Step 3

    Middle boards

    Fit the middle clips into the groove of the board already laid, slide in the next one and repeat.
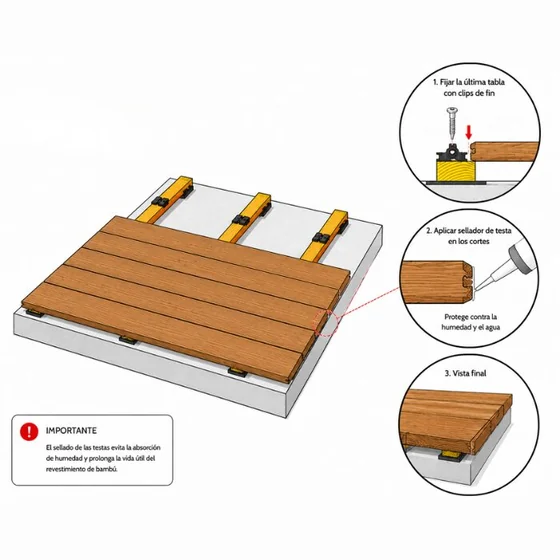
  4. Step 4: final sealing

    Step 4

    Final sealing

    Fix the last board with end clips and apply end-grain sealer to the cuts, against damp.

Bamboo · Cladding

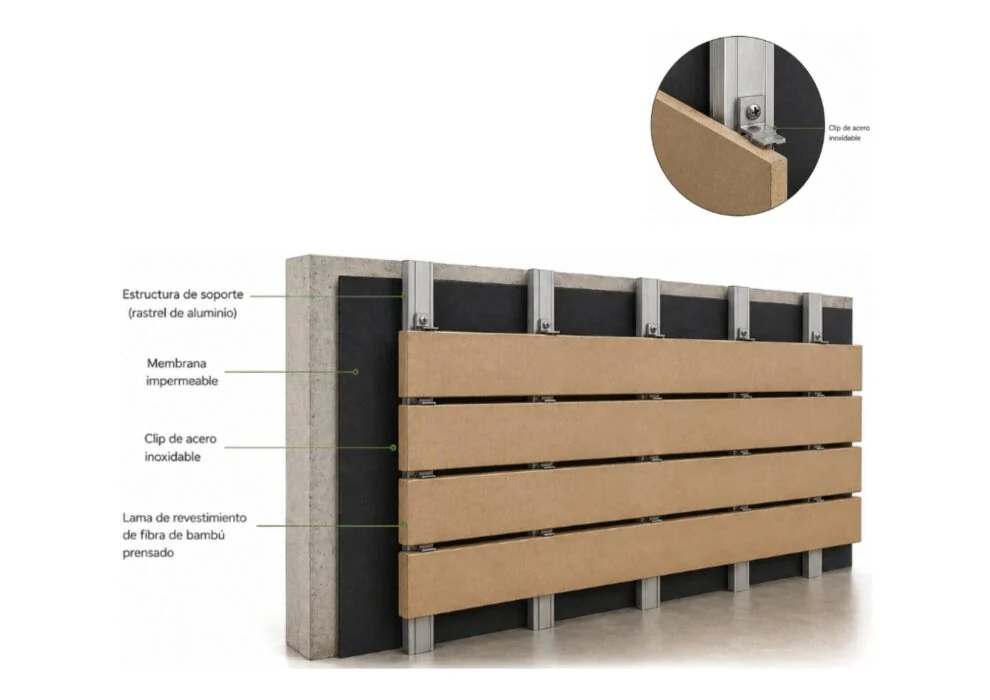
Ventilated façade

For ventilated façades, enclosures and sheltered external walls. The clip fixes the board to the joist without piercing the face, and the air cavity does the rest.
Before you start

The surface

  • A firm wall, with nothing loose and reasonably flat.
  • Compulsory a ventilated substructure — aluminium or treated timber — with an air cavity of 20-30 mm.
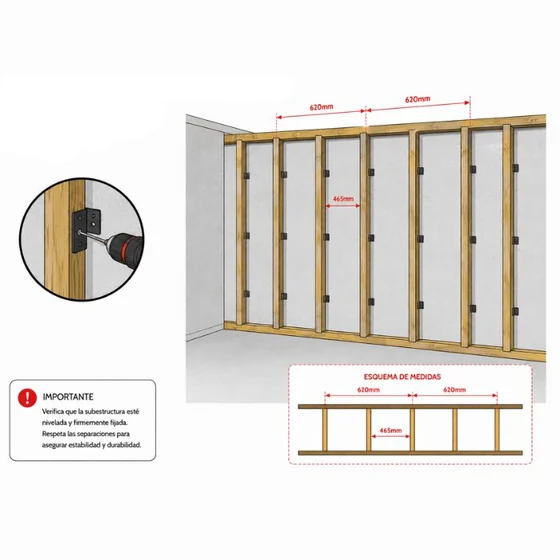
  • Spacing between joists of 620 mm.
  • The joists must end up perfectly coplanar.
  • 50 mm minimum above the finished floor, to avoid contact with damp.
  • Ventilation behind the cladding, to carry the moisture away.

The material

  • Only with the hidden fastening clipsystem: no piercing the face.
  • Pre-drilling is compulsory: it prevents splitting and delamination from the screw tip.
  • Gap between boards of 3-5 mm for the natural expansion of the bamboo.
  • Cut and fit the panels to the real measurements, for clean corners and junctions.
Diagram of the ventilated bamboo façade: wall, joist, air cavity and board with clip
Map of the surface: wall, joist, air cavity and hidden clip.

What the system includes

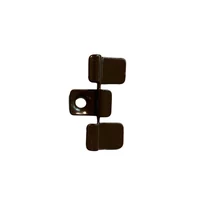
Hidden fastening clipsThey fix the board to the joist without piercing the visible surface.
Stainless steel screwsResistant to outdoor corrosion.

What it gives you

  • Invisible fixing
  • Natural movement under control
  • High dimensional stability
  • Longer life outdoors
  • A clean, modern look

The steps

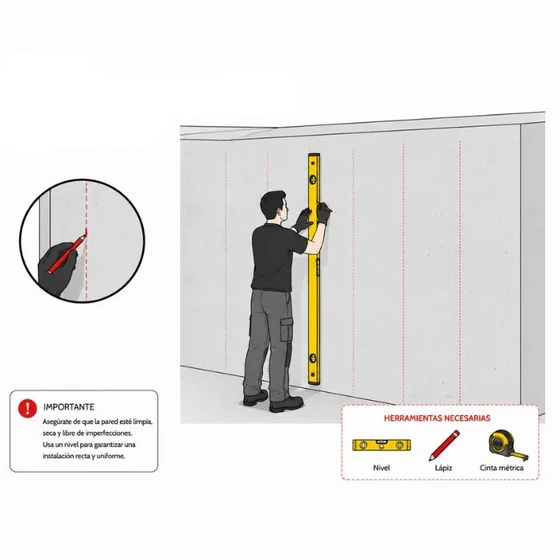
  1. Step 1: preparing the substrate

    Step 1

    Preparing the substrate

    Check that the wall is level and mark out the installation guides.
  2. Step 2: assembling the substructure

    Step 2

    Assembling the substructure

    Joists aligned, 465 mm apart, and beams at 620 mm.
  3. Step 3: clips on the joists

    Step 3

    Clips on the joists

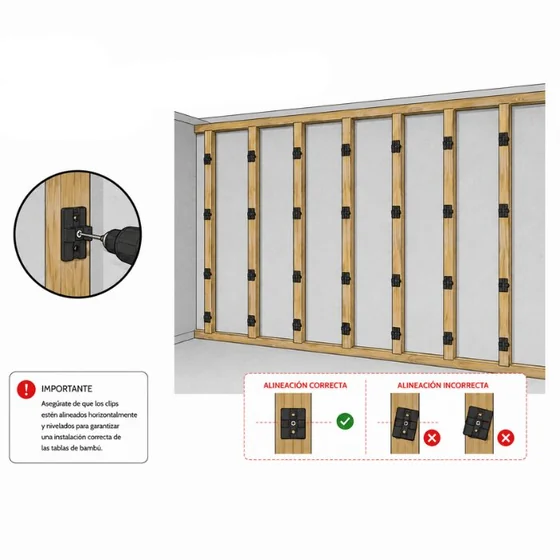
    Fix the clips on each joist, correctly aligned.
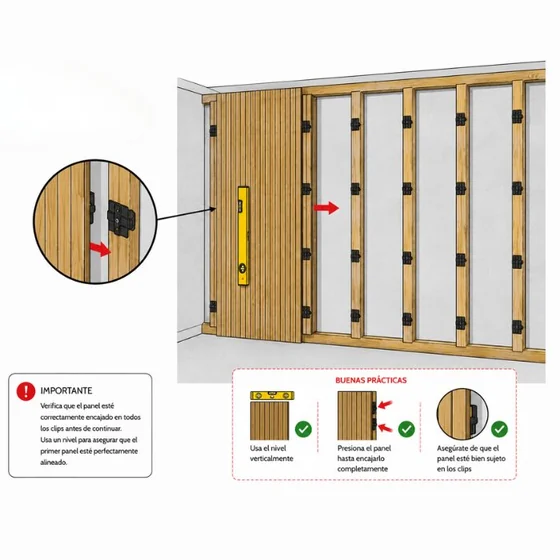
  4. Step 4: first panel

    Step 4

    First panel

    Place and clip in the first panel, making sure it is level.
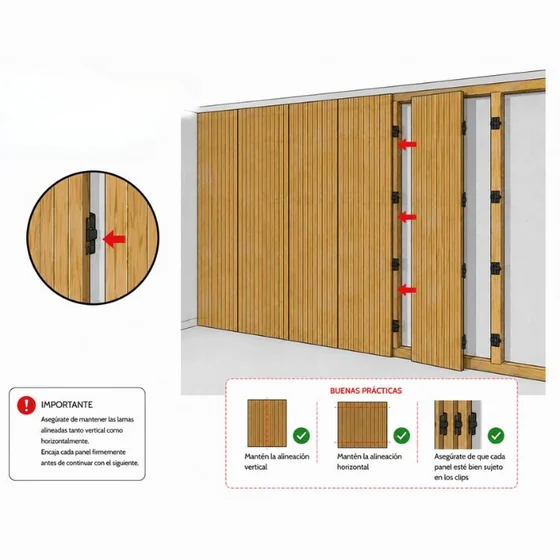
  5. Step 5: installing the panels

    Step 5

    Installing the panels

    Clip the boards in one after another, keeping the alignment.
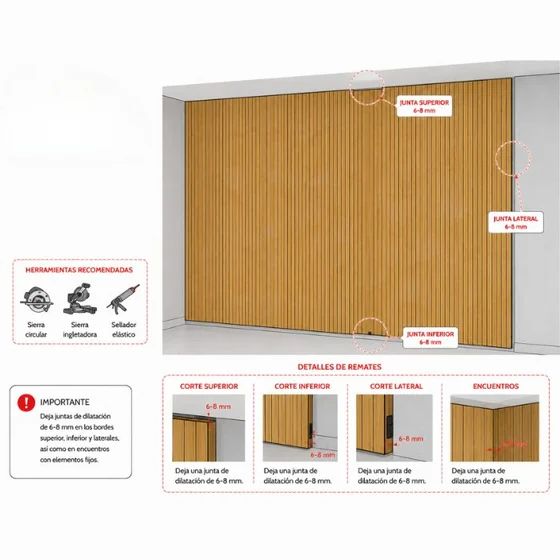
  6. Step 6: final trims

    Step 6

    Final trims

    Cuts and trims, leaving the expansion joints.
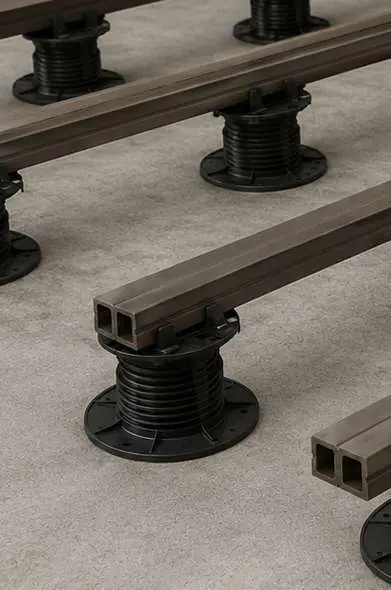
Adjustable pedestals levelling the substructure of a deck

Before you start

The planner counts the battens and the clips too.

Metres of batten, support lines and clip quantities, as well as the boards.